Inventory
Naninovel Inventory
Update: The sample has moved to the monorepo: https://naninovel.com/guide/samples GitHub links below are no longer active.
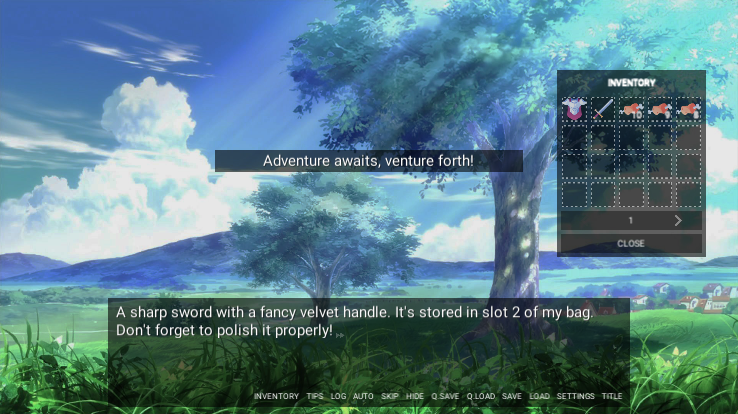
While an inventory system is out of scope for visual novels, we had a lot of requests and questions on how to integrate one with Naninovel. The GitHub project serves as an example for creating and integrating an inventory extension, which you can set up on top of Naninovel installation without modifying the engine source code.
The example project shows how to make a custom inventory UI with grid layout, pagination and drag-drop window, add custom engine service and related configuration menu, add input bindings, use state outsourcing, author custom scenario commands and expression functions.
You can clone the project repository with a Git client or download it as a zip archive.
Be aware, that Naninovel package is not distributed with the project, hence compilation errors will be produced after opening it for the first time; import Naninovel from the Asset Store to resolve the issues.
Installation
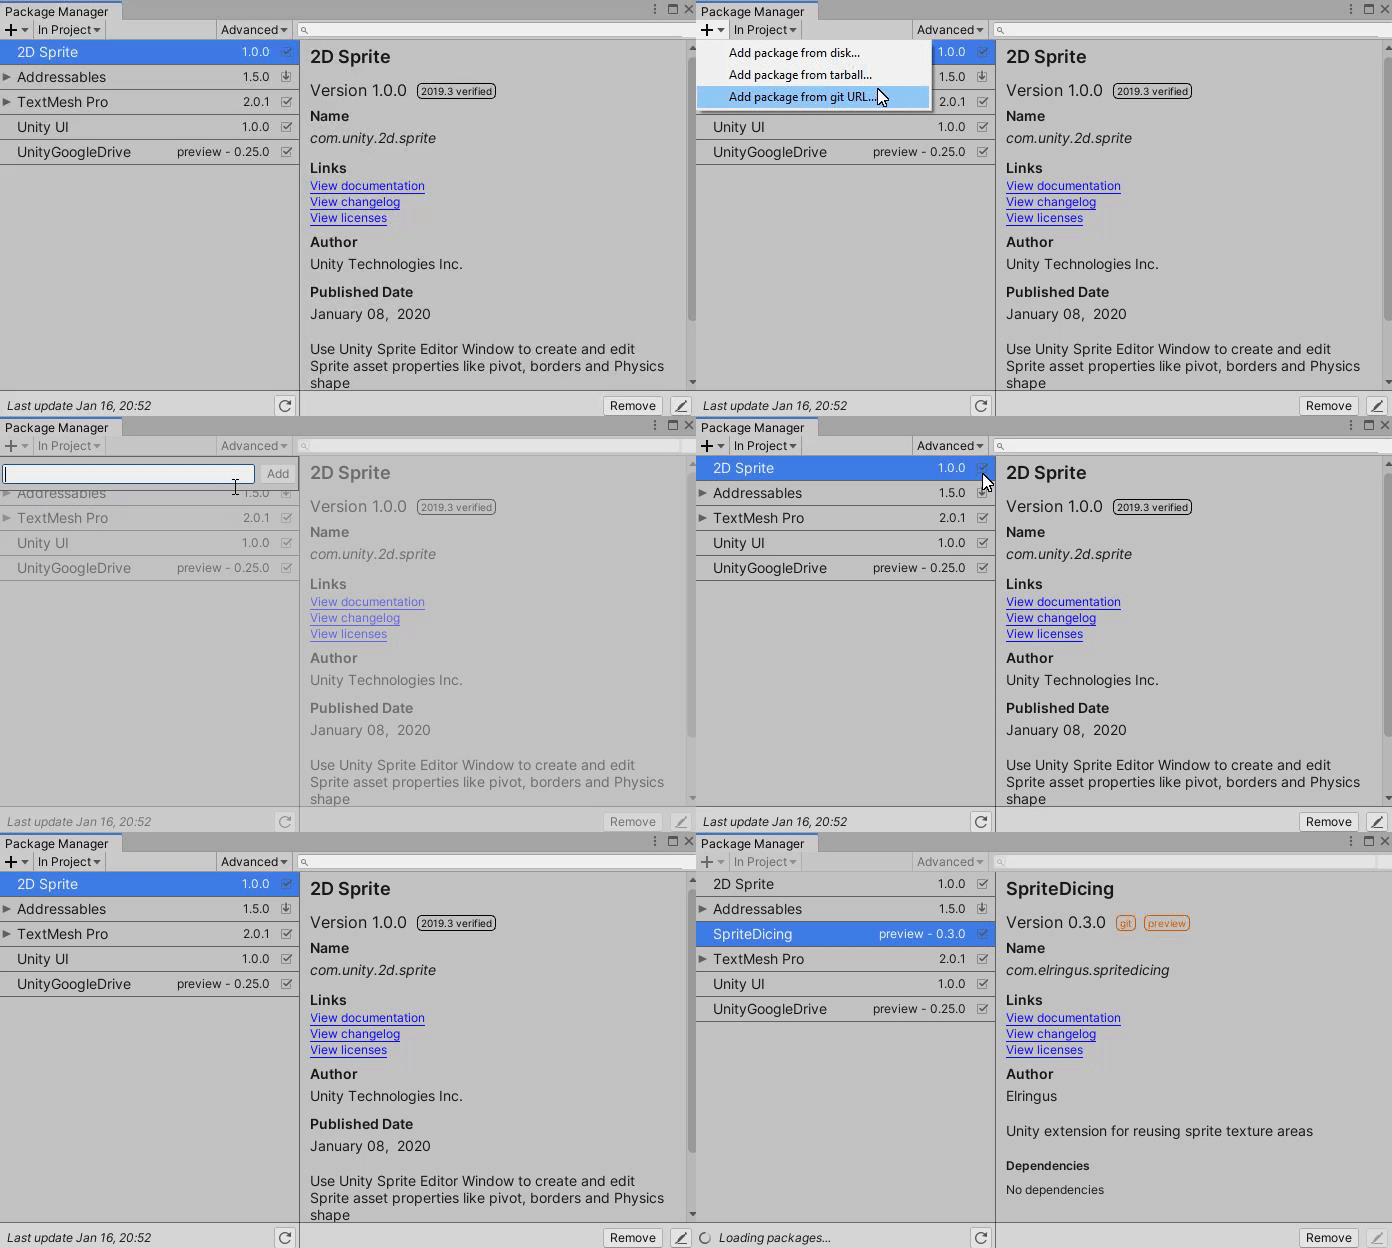
To setup inventory extension on top of an existing Unity project use UPM to install the package via the following git URL: https://github.com/Elringus/NaninovelInventory.git?path=Assets/NaninovelInventory or download and import NaninovelInventory.unitypackage manually.
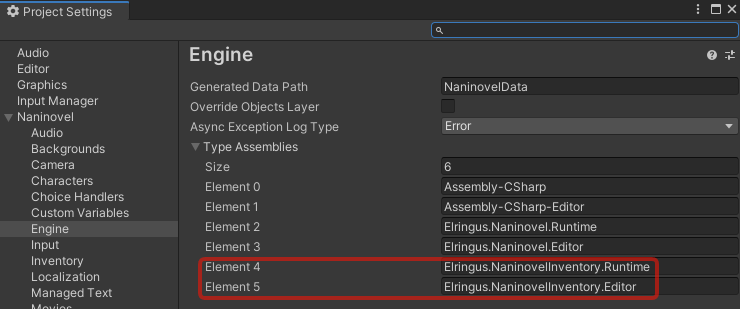
After importing the package, add Elringus.NaninovelInventory.Runtime and Elringus.NaninovelInventory.Editor records to the Type Assemblies list property found in the engine configuration menu and restart Unity editor (otherwise the custom implementation types under the assemblies won't be accessible by Naninovel).
Usage
To create a pre-made inventory UI from template, use Create -> Naninovel -> Inventory -> Inventory UI asset context menu. Then add the prefab to the Naninovel UI resources via Naninovel -> Resources -> UI editor menu. Once added, the UI can be shown/hidden like all the other UIs with @showUI and @hideUI commands.
The Inventory UI component has Capacity property, where you can change number of slots in the inventory. Slot grid is configured (slot number and layout, slots per page, etc) via Content/InventoryGrid game object. Window drag-drop behavior can be configured (disabled) via Drag Drop component attached to Content game object.
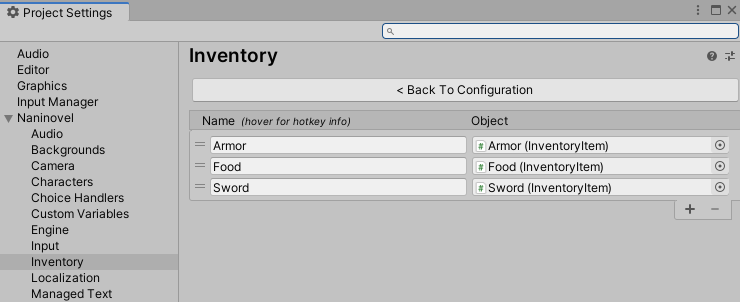
Inventory item prefabs can be created with Create -> Naninovel -> Inventory -> Inventory Item asset context menu. The item prefabs will then need to be assigned as inventory resources via Naninovel -> Resources -> Inventory editor menu.
In case you have a lot of items and it's inconvenient to assign them via editor menu, it's possible to just drop them at Resources/Naninovel/Inventory folder and they'll automatically be exposed to the engine. You can additionally organize them with sub-folders, if you wish; in this case use forward slashes (/) when referencing them in naninovel scripts. Eg, item stored as Resources/Naninovel/Inventory/Armor/FullPlate.prefab can be referenced in scripts as Armor/FullPlate.
It's also possible to use addressable asset system to manually expose the resources. To expose an asset, assign address equal to the path you'd use to expose it via the method described above, except omit the "Resources/" part. Eg, to expose a "FullPlate.prefab" item, assign the prefab asset following address: Naninovel/Inventory/FullPlate. Be aware, that addressable provider is not used in editor by default; you can allow it by enabling Enable Addressable In Editor property in resource provider configuration menu.
Each item has a Stack Count Limit property to limit how much items of this type can be stacked in a single inventory slot and a On Item Used Unity event, which is invoked when the item is used (either via @useItem command or when user clicks on the item in the inventory). Below is an example on how you can setup the event with Play Script component to remove the item once it used, spawn a glitch special effect and print a text message.
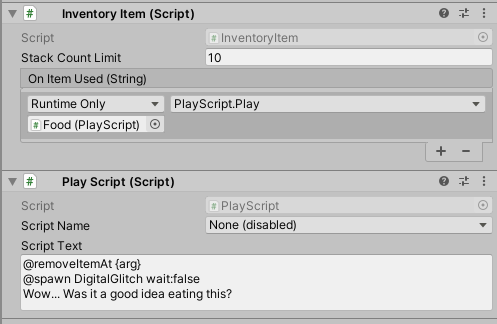
You can add items to the inventory with @addItem command and remove with @removeItem (or @removeItemAt, @removeAllItems). Item IDs are equal to the item prefab names. Inventory slot IDs are equal to the grid slot indexes (eg, first slot is 0, second is 1, etc).
ItemExist() and ItemCount() custom expression functions to check wither an items exist in inventory and number of existing items are also available for convenience.
Below is a script from the example project:
Code: Select all
# Start

Select an action.[skipInput]

@choice "Pick up sword" if:!ItemExist("Sword") do:"@addItem Sword, @goto .Adventure"
@choice "Pick up armor" if:!ItemExist("Armor") do:"@addItem Armor, @goto .Adventure"
@choice "Adventure awaits, venture forth!"
@stop

# Adventure

@if ItemExist("Sword")
	@set monstersSlayed="{ItemExist("Armor") ? Random(3,5) : 2}"
	@addItem Food amount:{monstersSlayed}
	You've encountered and slayed {monstersSlayed} monsters with your sword.[if !ItemExist("Armor")] You could've been more productive with an armor, though.[endif][i][showUI Inventory wait:false] Check your inventory for the loot!
	@goto .Start
@else
	But you don't have a weapon! You've been beaten by the monsters.[if ItemExist("Armor")] At least it didn't hurt that much, thanks to the armor.[endif] Let's prepare better next time.
	@goto .Start
@endif